XCA supports MySQL, MariaDB and PostgreSQL as database server. This article shows briefly how to setup a database for XCA.
Prepare the XCA installation
SQL Remote Database Drivers
MySQL plugins are not shipped with QT anymore because of license issues.
Linux
- Debian:
libqt6sql6-psql libqt6sql6-mysql or libqt6sql6-odbc. - RPM:
libqt6-database-plugin-pgsql libqt6-database-plugin-mysql libqt6-database-plugin-odbc - Debian Qt5:
libqt5sql5-mysqllibqt5sql5-psql
They should pull in all necessary dependencies.
Apple macos
- PostgreSQL: Install the https://postgresapp.com/
- ODBC: It requires the `/usr/local/opt/libiodbc/lib/libiodbc.2.dylib`. When installing unixodbc via `brew` the library must be symlinked from `/opt/homebrew/Cellar/libiodbc/3.52.16/lib/libiodbc.2.dylib`
- MariaDB: Probably via ODBC ?
Windows
- PostgreSQL: https://www.enterprisedb.com/downloads/postgres-postgresql-downloads (Commandline tools). Add the `bin` directory of the Postgres installation directory to your PATH (C:\\Program Files\\PostgreSQL\\16)
- ODBC: Use the
ODBC Datasources 64bit appto configure the SQL Server - MariaDB (MySQL): Install the Plugin from here: https://github.com/thecodemonkey86/qt_mysql_driver. Select the MinGW variant and install it as documented.
Prepare the database
Setting up the database is as easy as:
- Create a database
- Create a user with full access to this database
- Setup network access permissions if required
The following examples assume:
- The database username as 'youruser'
- The database name as 'yourdbname'
- The password as 'yourpass'
- The Server IP as 10.1.0.1/16
PostgreSQL
Connect to your database as root:
$ sudo -u postgres psql
CREATE USER youruser WITH ENCRYPTED PASSWORD 'yourpass';
CREATE DATABASE yourdbname OWNER youruser;
GRANT ALL PRIVILEGES ON DATABASE yourdbname TO youruser;
For remote access:
- Add the required "listen_addresses=localhost,10.1.0.1" in /etc/postgresql/9.1/main/postgresql.conf
- Enable the new user for remote access:
$ sudo sh -c 'echo "host yourdbname youruser 10.1.0.0/16 md5" >> /etc/postgresql/9.1/main/pg_hba.conf'
- Reload the server:
$ sudo /etc/init.d/postgresql reload
MySQL / MariaDB
Connect to your database as root:
$ mysql -u root -p
CREATE DATABASE yourdbname;

GRANT ALL PRIVILEGES ON yourdbname.* to 'youruser'@'localhost' IDENTIFIED BY "yourpass";
GRANT ALL PRIVILEGES ON yourdbname.* to 'youruser'@'10.1.%' IDENTIFIED BY "yourpass"; -- For network access only
FLUSH PRIVILEGES;
TLS Encrypted Database Connection
First of all you need certificates. A root ca and a server certificate with CN=hostname and SAN setup properly. Using XCA for this task is probably an option. Save them as cacert.pem, server-cert.pem and server-key.pem
PostgreSQL Server Configuration
Edit /etc/postgresql/9.6/main/pg_hba.conf and enforce SSL for user youruser
hostssl yourdbname youruser 10.1.0.0/16 md5
Edit /etc/postgresql/9.6/main/pg_hba.conf and Enable TLS
ssl = true
ssl_prefer_server_ciphers = on
ssl_cert_file = '/etc/postgresql/9.6/main/server-cert.pem'
ssl_key_file = '/etc/postgresql/9.6/main/server-key.pem'
ssl_ca_file = '/etc/postgresql/9.6/main/cacert.pem'
and put the generated certificates in place.
XCA should already have saved the server-key.pem with permission 0600. Give postgres permission to the certificate and key:
chown postgres:postgres '/etc/postgresql/9.6/main/*.pem'
PostgreSQL Client Configuration
This configuration affects the pgsql connector, which is used by XCA. Symlink or copy the root CA certificate.
cp /etc/postgresql/9.6/main/cacert.pem ~/.postgresql/root.crt
On Windows the file location is
%appdata%/postgresql/root.crt
To verify the hostname during connection, start XCA with the environment variable PGSSLMODE=verify-full set:
PGSSLMODE=verify-full xca
More documentation on https://www.postgresql.org/docs/current/libpq-ssl.html
MariaDB Server Configuration
Edit the mariadb section in the file /etc/mysql/mariadb.conf.d/50-server.cnf:
[mariadb]
 ssl_ca=/etc/mysql/cacert.pem
 ssl_cert=/etc/mysql/server-cert.pem
 ssl_key=/etc/mysql/server-key.pem
 ssl=on
 ssl_cipher=DHE-RSA-AES256-SHA:AES256-SHA:AES128-SHA
Enforcing Encryption and rejectin unencrypted connections is documented here: https://mariadb.com/kb/en/securing-connections-for-client-and-server/
MariaDB Client Configuration
While the QT mySQL/MariaDB driver supports the configuration of SSL_CA certs I did not find a way to configure the ssl-verify-server-cert without patching the QT mySQL driver. If you know how, please tell me. Anyway, the connection is already encrypted with the server configuration above, but the server certificate is not verified and not protected against a MITM attack.
More documentation on https://mariadb.com/kb/en/securing-connections-for-client-and-server/
Importing an existing SQLite database
If you have an existing XCA file database, it can be imported, but only before the remote database is opened the first time. Using a table prefix is also not that easy currently. Export the .xdb file with:
$ sqlite3 your.xdb .dump > dump.sql
If the target database is MySQL or MariaDB, the dump.sql file must be modified. Delete the first 2 lines:
PRAGMA foreign_keys=OFF;
BEGIN TRANSACTION;
And add the line:
SET SESSION SQL_MODE='ANSI';
For PostgreSQL no modification is required. Insert the sql file via:
$ mysql -u xca -p xca < dump.sql
$ psql -h localhost xca xca < dump.sql
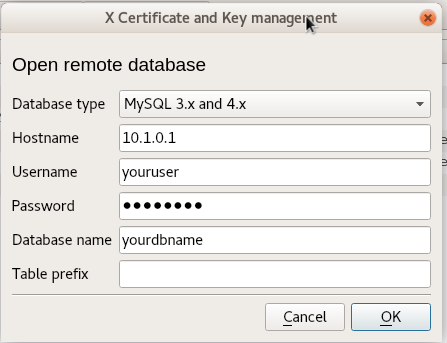
XCA Connection dialog

More than one XCA database in one remote database
The Table Prefix can be used to store more than one XCA database in the same remote database by using different table prefix settings.
Database passwords
When handling remote databases, there are 2 passwords. The first one for the database user 'youruser' (in this examples 'yourpass') to get permission to access the database server itself. XCA asks for it with:
"Please enter the password to access the database server 10.1.0.1 as user 'youruser'."
The second one is the encryption/decryption password for the private keys stored inside the database. This is the password XCA also manages for SQLite databases
"Please enter the password for unlocking the database: youruser@10.1.0.1/QMYSQL3:yourdbname"
This password is never transmitted over the network to the database server un-hashed. When using more than one XCA database in one server database only differing in the Table Prefix feature described above, the database server password for 'youruser' (in this examples 'yourpass') is the same for all those XCA databases. The password for encrypting and decrypting the private keys may be different for each.


